
As a tech leader, one of your worst nightmares might be discovering that your revenue pipeline has been silently leaking due to failed payments. Whether it's expired cards, insufficient funds, or bank declines, payment failures can significantly impact your bottom line. In this guide, we'll explore how to properly handle failed payments using Laravel Cashier with Stripe.
Understanding Payment Failures
Before diving into the implementation, let's understand why payments fail and their business impact. According to Stripe's data, the average business loses about 9% of its recurring revenue to payment failures. The good news? Up to 75% of these failed payments can be recovered with proper handling.
Common causes include:
- Expired or canceled cards
- Insufficient funds
- Bank declines due to suspicious activity
- Network or technical issues
- Required 3D Secure authentication
Setting Up Failed Payment Handling
First, ensure your Laravel application is properly configured with Stripe. We will assume you use Laravel Cashier (Stripe) in your project already, but if you're not - you can learn how to get started with Laravel Cashier (Stripe) here.
The most crucial part is setting up your webhooks correctly. Failed payments are communicated through Stripe's webhook system. Learn how to set up webhooks here so you can double-check your setup.
Implementing the Recovery Flow
Let's implement proper failed payment handling. Here's how to catch and handle incomplete payments:
use Laravel\Cashier\Exceptions\IncompletePayment;

try {
    $subscription = $user->newSubscription('default', 'price_monthly')
        ->create($paymentMethod);
} catch (IncompletePayment $exception) {
    return redirect()->route(
        'cashier.payment',
        [$exception->payment->id, 'redirect' => route('home')]
    );
}
When a payment requires additional confirmation (like 3D Secure), Cashier throws an IncompletePayment exception. The built-in payment confirmation page handles various payment scenarios:
public function confirmPayment($paymentId)
{
    try {
        $payment = $this->user->findPaymentOrFail($paymentId);

        // Redirect to Cashier's payment confirmation page
        return redirect()->route('cashier.payment', [
            'id' => $payment->id,
            'redirect' => route('billing.success')
        ]);
    } catch (IncompletePayment $exception) {
        // Handle any secondary payment failures
        return back()->withError('Payment confirmation failed.');
    }
}
Automatic Recovery with Notifications
For a more hands-off approach, implement automatic payment failure notifications. Laravel Cashier comes with a default notification already, which you can enable like so:
CASHIER_PAYMENT_NOTIFICATION=Laravel\Cashier\Notifications\ConfirmPayment
Testing Failed Payment Scenarios
Testing payment failures is crucial. Stripe provides test card numbers for various scenarios:
public function testFailedPaymentHandling()
{
    $user = User::factory()->create();

    try {
        // This card requires authentication
        $user->charge(1000, 'pm_card_threeDSecure2Required');
    } catch (IncompletePayment $exception) {
        $this->assertEquals('requires_confirmation', $exception->payment->status);
    }
}
You can see the full list of Stripe test cards that you can use to manually trigger various payment states, including failures. Use them to ensure your system behaves as expected in common failure scenarios before launching your app to production.
Business Considerations
While the technical implementation is important, don't forget about the business side:
- Dunning Strategy: Implement a progressive dunning strategy:
- Immediate notification for failed payments
- Follow-up emails at strategic intervals
- Clear communication about service impact
- Recovery Pipeline: Monitor these key metrics:
- Failed payment rate
- Recovery rate
- Time to recovery
- Revenue impact
- Customer Communication: Keep your messaging clear:
- Immediate notification of payment issues
- Clear instructions for updating payment methods
- Transparent timeline for service interruption
Best Practices and Recommendations
- Always Use Webhooks
- Don't rely solely on real-time API responses. A lot of actions in Stripe happen asynchronously.
- Configure all relevant webhook endpoints. If using Cashier (Stripe), you can find the full list of webhook events required here.
- Implement proper webhook signature verification. This ensures your site is protected from fake payment events.
- Implement Proper Error Handling
- Catch specific exceptions. Common exceptions in Cashier (Stripe) include
IncompletePaymentandInvalidPaymentMethod - Log failed payment attempts
- Monitor recovery rates
- Catch specific exceptions. Common exceptions in Cashier (Stripe) include
- Optimize Your Recovery Flow
- Make the payment update process seamless
- Provide multiple payment method options
- Consider offering grace periods for valuable customers
Here's an example of handling various payment scenarios:
use Laravel\Cashier\Exceptions\IncompletePayment;
use Laravel\Cashier\Exceptions\InvalidPaymentMethod;
use Stripe\Exception\InvalidRequestException;

public function processSubscription(Request $request)
{
   try {
       $subscription = $request->user()
           ->newSubscription('default', $request->price_id)
           ->create($request->payment_method);

       return redirect()
           ->route('billing.success')
           ->with('status', 'Your subscription has been activated!');

   } catch (IncompletePayment $exception) {
       // Payment needs additional confirmation (like 3D Secure)
       return redirect()->route('cashier.payment', [
           $exception->payment->id,
           'redirect' => route('billing.success')
       ]);

   } catch (InvalidPaymentMethod $exception) {
       // Handle payment method ownership mismatch
       Log::error('Payment method ownership mismatch', [
           'user' => $request->user()->id,
           'error' => $exception->getMessage()
       ]);

       return back()
           ->withError('The payment method does not belong to this customer. Please provide a valid payment method.');

   } catch (InvalidRequestException $exception) {
       // Handle other Stripe-related payment method issues
       Log::error('Stripe payment method error', [
           'user' => $request->user()->id,
           'error' => $exception->getMessage()
       ]);

       return back()
           ->withError('The payment method is invalid or expired. Please update your payment details.')
           ->with('show_payment_modal', true);

   } catch (\Exception $exception) {
       // Log other errors for monitoring
       Log::error('Subscription failed', [
           'user' => $request->user()->id,
           'error' => $exception->getMessage()
       ]);

       return back()->withError('Unable to process subscription.');
   }
}
Conclusion
Properly handling failed payments is crucial for maintaining healthy revenue streams. Laravel Cashier provides robust tools for managing payment failures, but success lies in implementing a comprehensive strategy that combines technical reliability with customer-focused recovery processes.
Remember, every recovered payment not only saves revenue but also maintains customer relationships. Monitor your failed payment metrics regularly and continuously optimize your recovery flow based on the data.
By implementing these patterns, you'll create a resilient billing system that minimizes revenue leakage and maintains customer satisfaction.
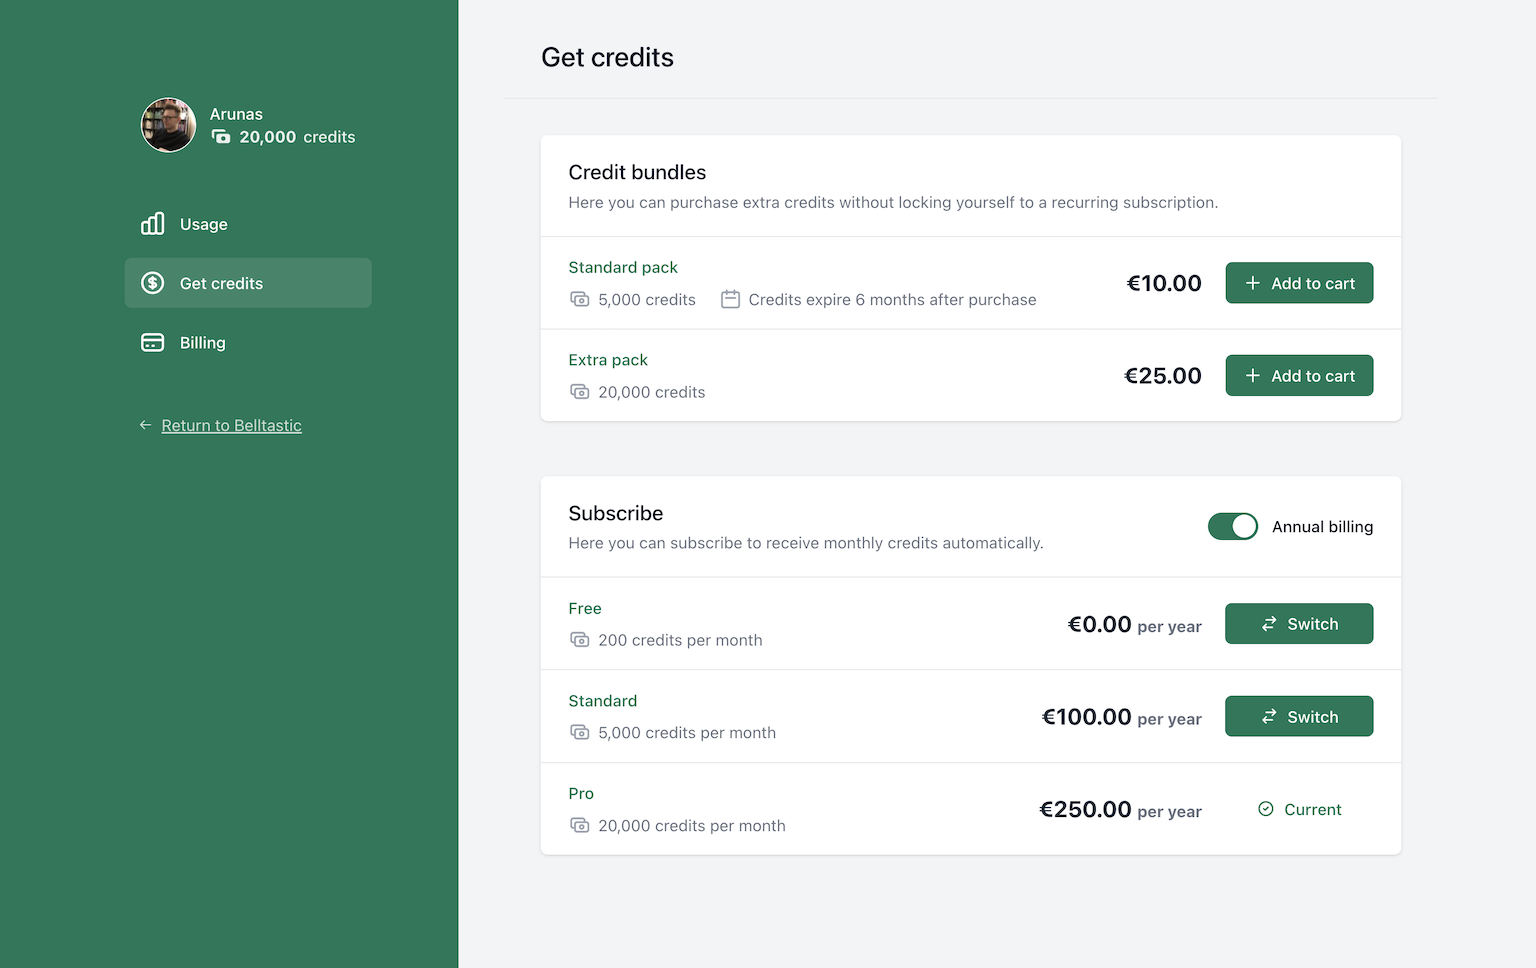
Want to skip the complexity of building and maintaining your own billing infrastructure?
Spike Billing provides a complete, self-hosted billing solution that integrates seamlessly with both Stripe and Paddle. Your customers get a fully-featured portal to manage their subscriptions, one-time purchases, and billing details, while you maintain full control over the experience.
Get started in minutes with our Laravel package, or explore our extensive customization options to match your specific business needs. Visit documentation to get started, or have a look at a live demo.