
Stripe works best in an asynchronous fashion - you make requests to charge a customer or create a new subscription, and Stripe will let you know when anything happens - payment succeeds, invoice is created, subscription is renewed, and much more. In this article we'll learn how to set it up on your Laravel project using Laravel Cashier.
Initial setup
First, make sure you have a Laravel project created and Laravel Cashier library added already. Please refer to one of our previous articles to learn how to do that.
You should also have your Stripe API keys set up inside .env environment variables. If you haven't done so yet, please go to Stripe API keys (test mode) page and copy over the API keys to your .env file:
STRIPE_KEY=pk_test_68L2V...
STRIPE_SECRET=sk_test_68L2V...
.env
How webhooks are handled by Laravel Cashier?
Laravel Cashier exposes a route specifically for receiving Stripe webhooks - /stripe/webhook. It does a lot already out of the box: verifies the webhook's authenticity (to make sure it has not been tampered and actually sent by Stripe), and handles a few events specific to handling payments and subscriptions made by Laravel Cashier.
Here are the default Stripe events that are handled by Laravel Cashier:
customer.subscription.createdcustomer.subscription.updatedcustomer.subscription.deletedcustomer.updatedcustomer.deletedpayment_method.automatically_updatedinvoice.payment_action_requiredinvoice.payment_succeeded
You could set them up manually in Stripe, but Laravel Cashier provides a convenient method of doing it automatically.
Set up Laravel Cashier's default events
To set up a webhook that listens to Laravel Cashier's default events, simply run this command:
php artisan cashier:webhookThe above command will set up a webhook in Stripe and point it to your app. By default, it will point to the domain set up in APP_URL environment variable. If you'd like to point it to a different domain or URL entirely, you can do so like this:
php artisan cashier:webhook --url "https://example.com/stripe/webhook"For more options, please visit Laravel Cashier's documentation.
Once the webhooks are set up, Stripe will send the above-mentioned events to your Laravel app, which will handle them accordingly.
Like we mentioned before, a number of these Stripe events is handled by Laravel Cashier already, but it's also possible to handle any of the other Stripe's existing events. Let's look at it next.
Handling other Stripe events
Your app may need to react to other Stripe events, which are not covered by Laravel Cashier by default.
First, learn what are the supported events by visiting this page, or listing them with this console command:
stripe help triggerListening to Stripe events in Laravel
First, let's create a new Laravel event listener:
php artisan make:listener StripeEventListenerThen, let's update the code of the listener like so:
<?php

namespace App\Listeners;

use Laravel\Cashier\Cashier;
use Laravel\Cashier\Events\WebhookReceived;

class StripeEventListener
{
    /**
     * Handle received Stripe webhooks.
     */
    public function handle(WebhookReceived $event): void
    {
        ['type' => $type, 'data' => $data] = $event->payload;

        if ($type === 'invoice.finalized') {
            // Let's send the invoice to the customer

        } else if ($type === 'charge.dispute.created') {
            // Let's notify our admin about a new dispute

        }

        // and so on ...
    }
}
app/Listeners/StripeEventListener.php
In the above code example, we're listening to invoice.finalized and charge.dispute.created Stripe events. The $type variable will contain this type of the event, and $data will contain the full event payload. To figure out what payload is being sent to your app, when developing locally, just dump it with Laravel's dump($data) or dd($data) methods.
Next, we must register this listener in our EventServiceProvider:
use Laravel\Cashier\Events\WebhookReceived;

class EventServiceProvider extends ServiceProvider
{
    /**
     * The event to listener mappings for the application.
     *
     * @var array<class-string, array<int, class-string>>
     */
    protected $listen = [
        // ...

        WebhookReceived::class => [
            StripeEventListener::class,
        ],
    ];
app/Providers/EventServiceProvider.php
Lastly, let's update the webhook on Stripe to also send the new events that we have described. Go to the Stripe Webhooks page and update it to include new events:
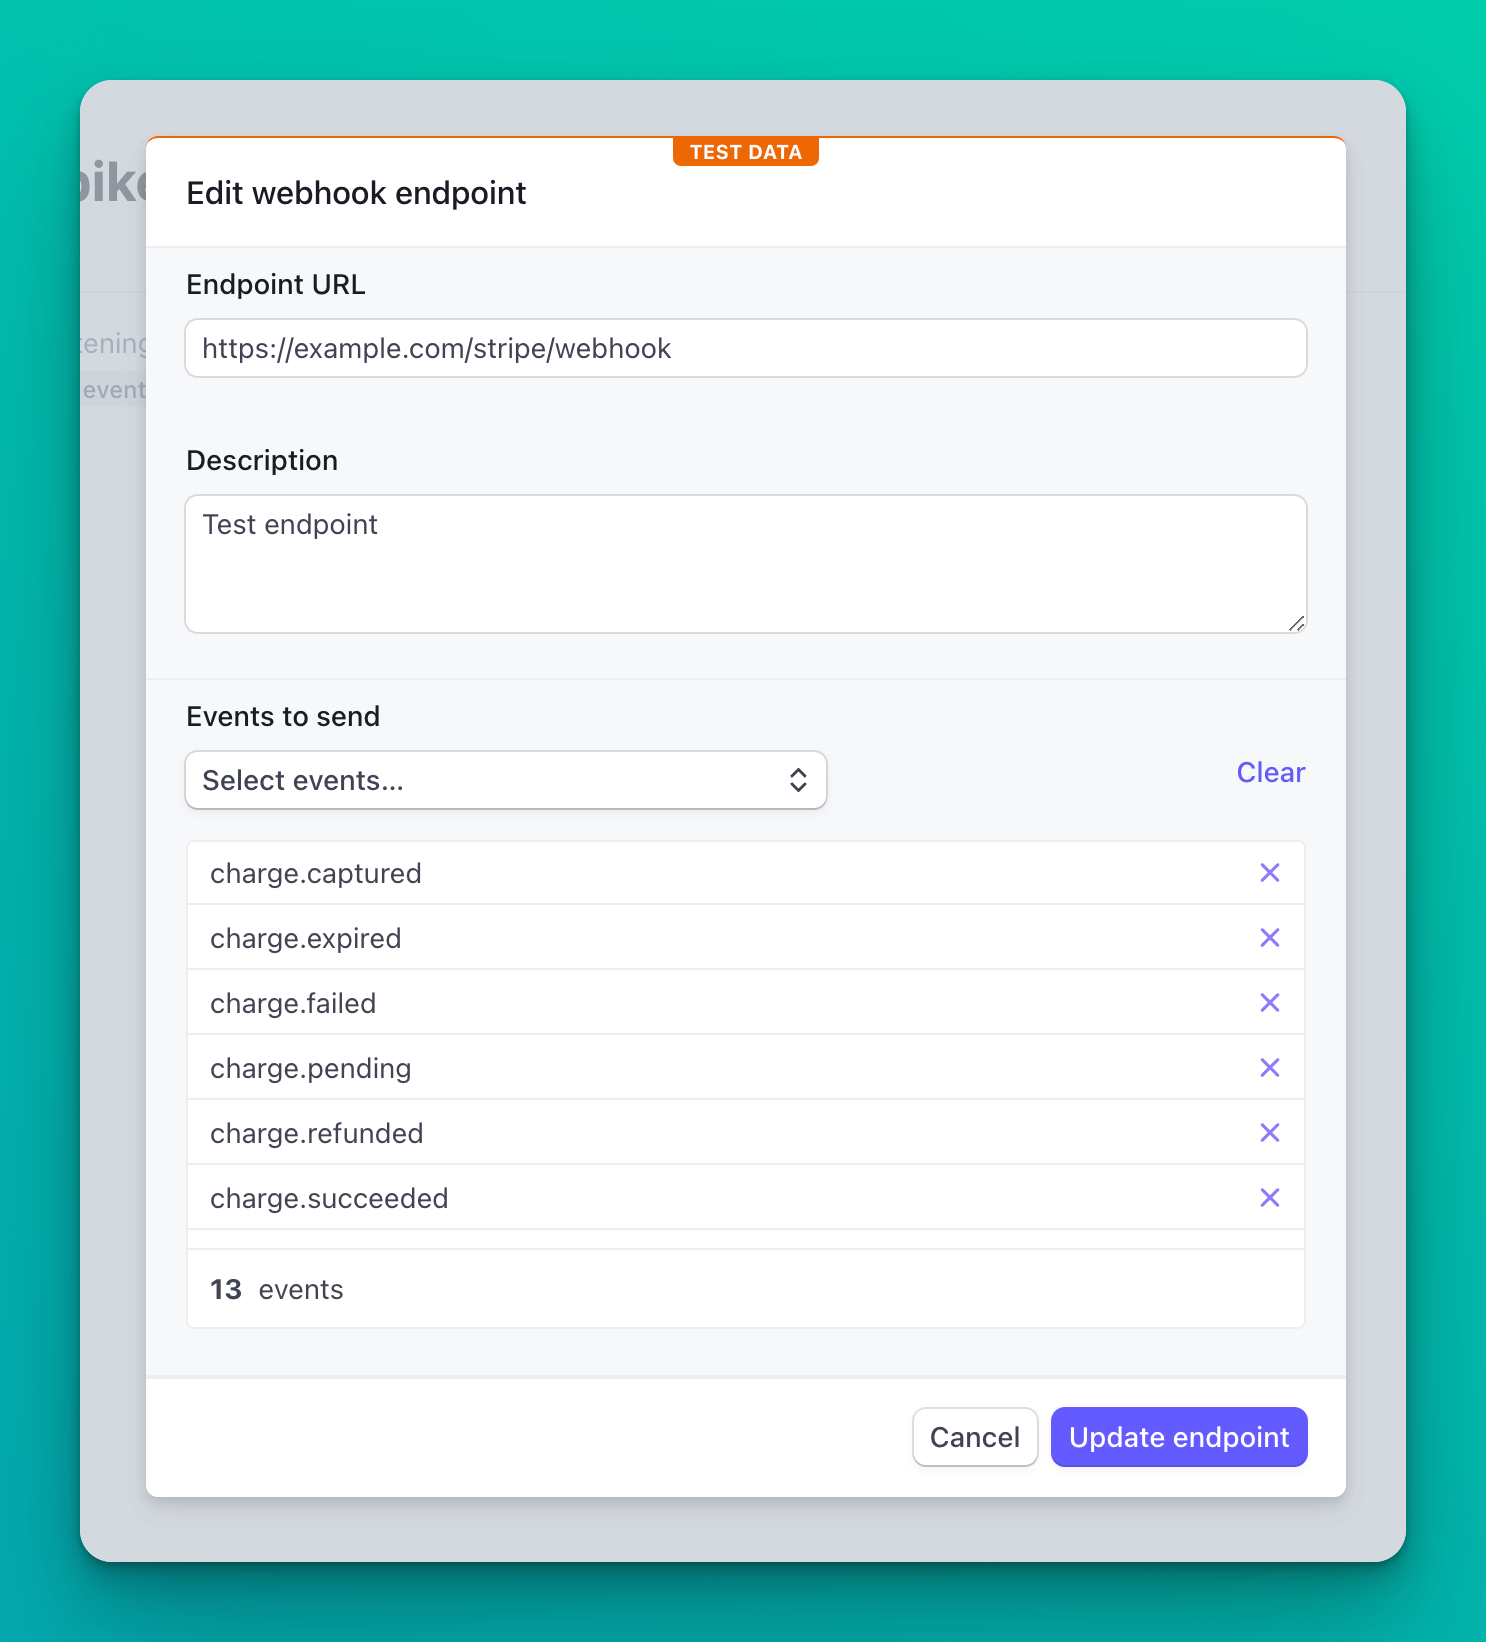
And that is it! Stripe will now also send you these new events to your app, whenever they happen.
Now let's see how to work with webhooks on your local dev environment for the easiest debugging experience.
Testing webhooks locally
Stripe has a handy CLI tool that allows you to forward Stripe events to a local app, and much more.
First, let's install the CLI tool by following Stripe's instructions on how to install Stripe CLI tool.
Next, log in to the CLI tool:
stripe loginOnce you're logged in, you can begin forwarding your Stripe events to your local Laravel app, like so:
stripe listen --forward-to http://your-app.test/stripe/webhookNote that Laravel Cashier exposes this /stripe/webhook endpoint by default, and that is where you should forward all the Stripe events.
When listening for events locally, Stripe will send everything. This can be useful when developing an app and you'd like to see what events are available, and how are they send when certain actions happen. Otherwise, if you'd like to focus on one or more particular events, you can limit the CLI tool to only specific comma-separated events, like so:
stripe listen --events charge.captured,charge.updated --forward-to http://your-app.test/stripe/webhookNow that your local app is listening to the events, how do we trigger them?
You can trigger events by either performing subscription/payment actions through your app, if you have developed it already, or, by using the stripe trigger CLI command, such as:
stripe trigger invoice.finalizedKeep in mind, though, that to run these test events, Stripe will create new customers/invoices/etc. In the above example, Stripe will create a new customer (which might not exist in your Laravel Cashier database), and will then create a new payment and new invoice for that payment. None of this data will exist in your Laravel app, but you will receive the event to your Laravel app anyway, which you can inspect, dump, and develop from there.
Conclusion
In conclusion, integrating Stripe with your Laravel project using Laravel Cashier offers a robust and efficient way to handle payments and subscriptions. By setting up Stripe API keys, configuring webhooks, and using Laravel Cashier's handling of these webhooks, you can effectively manage Stripe's asynchronous communication model.
The flexibility of Laravel Cashier allows for handling both default and custom Stripe events, giving you control over various payment-related actions. Additionally, the Stripe CLI tool's ability to forward events to your local development environment simplifies testing and debugging of webhook functionalities. This seamless integration not only allows for a better developer experience but also enhances the overall functionality and user experience of your Laravel application.
Want to skip the complexity of building and maintaining your own billing infrastructure?
Spike Billing provides a complete, self-hosted billing solution that integrates seamlessly with both Stripe and Paddle. Your customers get a fully-featured portal to manage their subscriptions, one-time purchases, and billing details, while you maintain full control over the experience.
Get started in minutes with our Laravel package, or explore our extensive customization options to match your specific business needs. Visit documentation to get started, or have a look at a live demo.