Testing payments locally can save you from major headaches once your app is live. Many teams rush to production, only to discover their payment system isn't handling certain cases correctly.
What could go wrong? Here are some real examples we've seen:
- Users getting charged twice for the same product
- Failed payments that should have worked
- Subscription renewals quietly failing without any alerts
- European cards getting declined due to missing 3D Secure support
In this guide, you'll learn how to test common payment flows in your Laravel app before launching. We'll cover both the happy path (when everything works) and various edge cases that could trip up your system.
By the end, you'll know how to check if your payment system can handle:
- Basic product purchases
- 3D Secure verification
- Credit card failures
- Subscription renewals
- Payment method updates
- Insufficient funds
We'll use real test card numbers and walk through each scenario step by step.
Setting Up Your Local Environment
Before we can test payments, we need to set up a few tools. Don't worry - it's simpler than it sounds.
1. Get Your Stripe Test Keys
First, grab your test API keys from Stripe:
- Log into your Stripe Dashboard
- Go to Developers → API keys
- Copy your "Secret key" that starts with
sk_test_ - Copy your "Publishable key" that starts with
pk_test_
Add these to your .env file:
STRIPE_KEY=pk_test_...
STRIPE_SECRET=sk_test_...
.env
2. Install Stripe CLI
The Stripe CLI lets you test webhooks locally. Here's how to set it up:
- Install the CLI:
brew install stripe/stripe-cli/stripe
For Windows or Linux, check Stripe's install guide. - Log in to connect your account:
stripe login - Start listening for webhooks:
stripe listen --forward-to localhost:8000/stripe/webhook
Replace the URL above with your own Laravel app's local URL
The CLI will show a webhook signing secret. Add it to your .env:
STRIPE_WEBHOOK_SECRET=whsec_....env
3. Set Up Laravel Cashier
If you haven't already, install Laravel Cashier:
composer require laravel/cashier
php artisan vendor:publish --provider="Laravel\Cashier\CashierServiceProvider"
php artisan migrate
That's it! Your local environment is ready for testing. In the next section, we'll start with testing a basic payment flow.
Testing Basic Payment Flow (Happy Path)
Let's start with the simplest case - a customer buys your product and everything works fine.
Test Card Details
For successful payments, use this test card:
Card:   4242 4242 4242 4242
Expiry: Any future date
CVC:    Any 3 digits
If you're wondering where this number comes from, Stripe offers numerous "test cards" to use in the test environment. Each test card has a specific behaviour attached as well, which can be useful when testing different outcomes. We'll come back to it a bit later!
Testing Steps
- First, make sure your Stripe listener is running:
stripe listen --forward-to localhost:8000/stripe/webhook- Now assuming you have a specific route set up where you charge your user - go and make that charge right now using the test card mentioned above. If you don't have any code written for placing charges yet, don't worry! Here's an example:
use Stripe\StripeClient;

public function purchase(Request $request)
{
    $stripe = new StripeClient(config('cashier.secret'));

    try {
        $paymentIntent = $stripe->paymentIntents->create([
            'amount' => 2000, // $20.00
            'currency' => 'usd',
            'payment_method' => $request->payment_method_id,
            'confirm' => true,
            'automatic_payment_methods' => [
                'enabled' => true,
                'allow_redirects' => 'never'
            ],
        ]);

        return response()->json([
            'status' => $paymentIntent->status,
            'client_secret' => $paymentIntent->client_secret,
        ]);
    } catch (\Stripe\Exception\CardException $e) {
        return response()->json([
            'error' => $e->getMessage()
        ], 422);
    }
}
app/Http/Controllers/PaymentsController.php
- Check your Stripe dashboard (Events tab) - you should see:
payment_intent.createdpayment_intent.succeededcharge.succeeded
What to Watch For
Even in this simple flow, check these things in the Stripe dashboard:
- Was the correct amount charged?
- Did your webhook handler run (if you have one set up)?
- Did your database record the payment (if you're recording payments locally)?
- Did the customer get a receipt (if you're sending the receipts)?
Common Issues
Here are problems we often see with the happy path:
- Forgetting to handle decimals (sending 20 instead of 2000 for $20.00). Remember, Stripe always works in cents (or the lowest possible denomination in any other currency)
- Missing webhook handling
- Not catching network errors. These can be especially difficult to debug after-the-fact, leaving developers confused as to why payment states are out of sync. This is one reason why you should also rely on webhooks from Stripe
- Not showing clear success messages to users. Let users know what had happened, so they can retry or otherwise fix whatever issue is at hand (e.g. incorrect card number or card being blocked)
Great, let's move to testing the most common reasons for payment failure.
Testing 3D Secure (3DS) Payments
If you have European customers, you need to handle 3D Secure. It's an extra security step where customers verify payments through their bank.
Test Card Details
Use this test card to always trigger 3D Secure:
Card:   4000 0027 6000 3184
Expiry: Any future date
CVC:    Any 3 digits
There are other 3D Secure related test cards which can help test similar behaviours.
Testing Steps
- Update your payment code to handle 3DS:
use Stripe\StripeClient;

public function purchase(Request $request)
{
    $stripe = new StripeClient(config('cashier.secret'));

    try {
        $paymentIntent = $stripe->paymentIntents->create([
            'amount' => 2000,
            'currency' => 'usd',
            'payment_method' => $request->payment_method_id,
            'confirm' => true,
            'automatic_payment_methods' => [
                'enabled' => true,
                'allow_redirects' => 'always' // Changed from 'never'
            ],
        ]);

        // Handle the 3DS flow
        if ($paymentIntent->status === 'requires_action') {
            return response()->json([
                'requires_action' => true,
                'client_secret' => $paymentIntent->client_secret
            ]);
        }

        return response()->json(['status' => $paymentIntent->status]);
    } catch (\Stripe\Exception\CardException $e) {
        return response()->json([
            'error' => $e->getMessage()
        ], 422);
    }
}
app/Http/Controllers/PaymentsController.php
- Add this JavaScript to handle the 3DS popup:
stripe.confirmCardPayment(clientSecret).then(function(result) {
    if (result.error) {
        // Handle error
        console.error(result.error);
    } else {
        // Payment successful
        console.log('Payment completed');
    }
});
What to Test
- Failed Authentication:
- Use card
4000 0027 6000 3184 - Click "Fail" in the 3DS popup
- Check that your error handling works
- Use card
- Successful Authentication:
- Use the same card
- Click "Complete" in the 3DS popup
- Verify the payment completes
Common Issues
Watch out for these problems:
- Not showing a loading state during 3DS
- Missing error handling if user closes the 3DS popup
- Not testing on mobile devices
- Timeout handling issues
Testing Card Declines
Sometimes cards get declined. Let's test these cases so your app handles them gracefully.
Test Cards for Declines
Different decline types need different test cards:
Generic Decline:    4000 0000 0000 0002
Insufficient Funds: 4000 0000 0000 9995
Expired Card:       4000 0000 0000 0069
Testing Card Addition
First, let's test what happens when a user tries to add a declined card:
public function addCard(Request $request)
{
    try {
        $user = $request->user();

        // Store the card and make it default
        $user->createOrGetStripeCustomer();
        $user->addPaymentMethod($request->payment_method_id);
        $user->updateDefaultPaymentMethod($request->payment_method_id);

        return response()->json(['success' => true]);
    } catch (\Stripe\Exception\CardException $e) {
        return response()->json([
            'error' => $e->getMessage(),
            'decline_code' => $e->getDeclineCode(),
        ], 422);
    }
}
app/Http/Controllers/PaymentMethodsController.php
Testing Subscription Creation
Next, test starting a subscription with a bad card. Make sure to replace the price_xxxxxx price identifier with your own recurring plan price ID.
public function startSubscription(Request $request)
{
    try {
        $user = $request->user();

        $user->newSubscription('default', 'price_xxxxxx')
            ->create($request->payment_method_id);

        return response()->json(['success' => true]);
    } catch (\Stripe\Exception\CardException $e) {
        return response()->json([
            'error' => $e->getMessage(),
            'decline_code' => $e->getDeclineCode(),
        ], 422);
    }
}
app/Http/Controllers/SubscriptionsController.php
What to Check
For each decline case:
- Does your error message make sense to users?
- Is the decline reason shown clearly?
- Can users easily try another card?
- Does your app stay in a good state after the decline?
Common Issues
Here's what often goes wrong:
- Showing technical error messages to users. Rewrite and localise error messages if needed, you don't want users quitting on their journey to giving you money!
- Not clearing loading states after declines
- Creating database records before charging the card. Another reason why depending on webhooks from Stripe is a good idea
- Not handling network errors
Testing Subscription Renewals
Failed renewals can silently kill your revenue. Let's test these cases carefully.
Stripe has this new feature called "Test Clocks" which allow you to simulate subscriptions moving through time and renewing, so you can test what exactly happens during renewals. Perfect tool for our use case here! After all, you don't want to deploy to production and find out 30 days later that your app cannot handle renewals.
Let's test subscription renewals using Stripe's UI and your local environment.
Setup Steps
- Ensure your local app is listening to Stripe webhooks:
stripe listen --forward-to localhost:8000/stripe/webhook- Go to Stripe Dashboard, switch to Test Mode, and visit the Subscriptions page.
Creating a Test Subscription
Create a subscription in your app using one of these cards:
Success: 4242 4242 4242 4242
Fails After First Payment: 4000 0000 0000 0259
Running the Renewal Test
- Find and click on the new subscription in the Stripe's Subscriptions page
- Look for "Run simulation" at the top of the page
- Click it and pick a future date (you can go up to 2 renewal cycles ahead)
- Click "Advance time"
What to Check
Watch your terminal running stripe listen. You should see webhooks coming in:
For successful renewals:
invoice.createdinvoice.paidinvoice.payment_succeeded
For failed renewals:
invoice.createdinvoice.payment_failed
Check that your app:
- Logs these events
- Updates subscription status
- Sends user notifications
- Handles payment retries
Common Issues
- Make sure your webhook listener is running before advancing time
- Check your logs for any webhook handling errors
- Verify your database shows the correct subscription status
- Confirm notification emails are being sent (check your local logs)
Tip: If you need to test multiple renewals, you can run several simulations. Just remember you can only advance 2 billing cycles at a time.
Need to start fresh? Click "Finish simulation" in Stripe Dashboard to clean up the test subscription and customer.
Best Practices and Tips
Here are key things we've learned from years of working with Stripe payments.
Logging Is Your Friend
Always log these things:
// In your webhook handler
Log::info('Stripe webhook received', [
    'type' => $event['type'],
    'customer' => $event['data']['object']['customer'],
    'amount' => $event['data']['object']['amount'] ?? null,
]);

// In your error handler
Log::error('Stripe payment failed', [
    'error' => $e->getMessage(),
    'decline_code' => $e->getDeclineCode(),
    'customer_id' => $user->stripe_id,
]);
Debug Webhooks Like a Pro
- Keep the
stripe listenoutput visible while testing - Check both failed and successful webhook delivery in Stripe Dashboard
- Use Stripe's webhook test button to retry specific events
- Save failed webhook payloads for debugging
Database Tips
Store these fields for better debugging:
Schema::table('subscriptions', function (Blueprint $table) {
    $table->json('last_payment_error')->nullable();  // Store payment errors
    $table->timestamp('last_webhook_received_at');  // Track webhook timing
});
Testing in CI/CD
Add these to your CI pipeline:
# Example GitHub Actions workflow
steps:
  - name: Test Stripe Integration
    env:
      STRIPE_KEY: ${{ secrets.TEST_STRIPE_KEY }}
      STRIPE_SECRET: ${{ secrets.TEST_STRIPE_SECRET }}
    run: |
      php artisan test --filter=Stripe
Test critical paths in CI:
- Payment creation
- Webhook signature validation
- Basic subscription flows
Skip tests that need webhook delivery in CI - test these in your local environment instead.
Testing Rules
- Always test with the test cards provided by Stripe, not fake numbers
- Test every new payment flow in local before staging/production
- Keep a checklist of scenarios to test before each deploy
- Test with different currencies if you support them
Common Production Issues to Test For
- Network timeouts
- Double charges
- Webhook delays
- Subscription downgrades/upgrades
- Payment method changes during trial
- Failed payments during trial to paid transition
Quick Test Checklist
Before each deploy, check:
 [ ] Basic payment works
 [ ] 3D Secure flow completes
 [ ] Subscription can be created
 [ ] Card updates work
 [ ] Webhook endpoint is correct
 [ ] Error messages are clear
 [ ] Logging is helpful
 [ ] Email notifications work
The extra time spent testing will save you from losing revenue and customers.
Conclusion
Testing payment flows might feel like extra work now, but it's far cheaper than fixing issues in production. A single failed payment can cost you more than just the dollar amount - it damages customer trust and can lead to subscription cancellations.
Let's put this in perspective:
- A declined card that should've worked = lost revenue
- A failed renewal without proper notification = angry customer
- A 3D Secure error = European customers can't pay
- A webhook that wasn't tested = silent subscription failures
Each of these issues directly impacts your bottom line. The good news? All of them are preventable with proper testing.
Keep this guide bookmarked, use the test cards we covered, and always test your payment flows locally before deploying. Your future self (and your revenue) will thank you.
Remember: In the world of SaaS, your billing system isn't just infrastructure - it's the heart of your business. Treat it that way.
Additional Resources
Want to learn more? Check out:
- Stripe Testing Guide - Complete list of test cards and scenarios
- Laravel Cashier Docs - Deep dive into Laravel's Stripe integration
- Stripe API Changelog - Stay updated on API changes
- Strong Customer Authentication - Learn about 3DS requirements
- Stripe Testing Best Practices - Advanced testing tips
For local testing tools:
- Stripe CLI - Essential for webhook testing
- Stripe API Libraries - Official PHP library
- Laravel Cashier on GitHub - See latest updates and issues
Remember: Payment testing is an ongoing process. Keep these resources handy and update your test scenarios as you add new payment features.
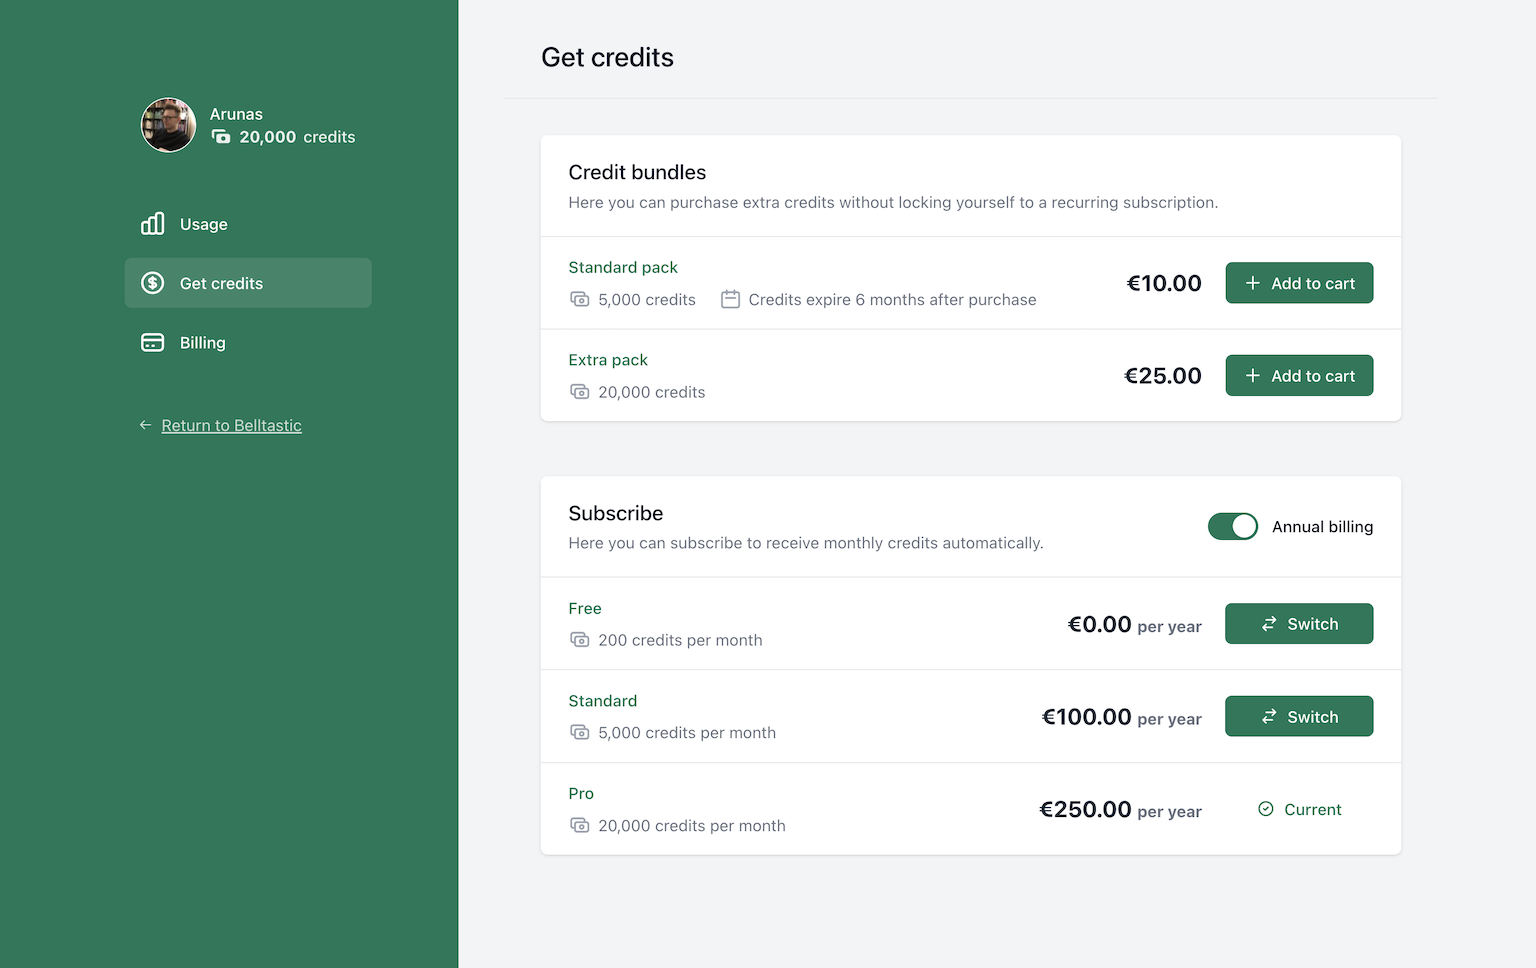
Want to skip the complexity of building and maintaining your own billing infrastructure?
Spike Billing provides a complete, self-hosted billing solution that integrates seamlessly with both Stripe and Paddle. Your customers get a fully-featured portal to manage their subscriptions, one-time purchases, and billing details, while you maintain full control over the experience.
Get started in minutes with our Laravel package, or explore our extensive customization options to match your specific business needs. Visit documentation to get started, or have a look at a live demo.