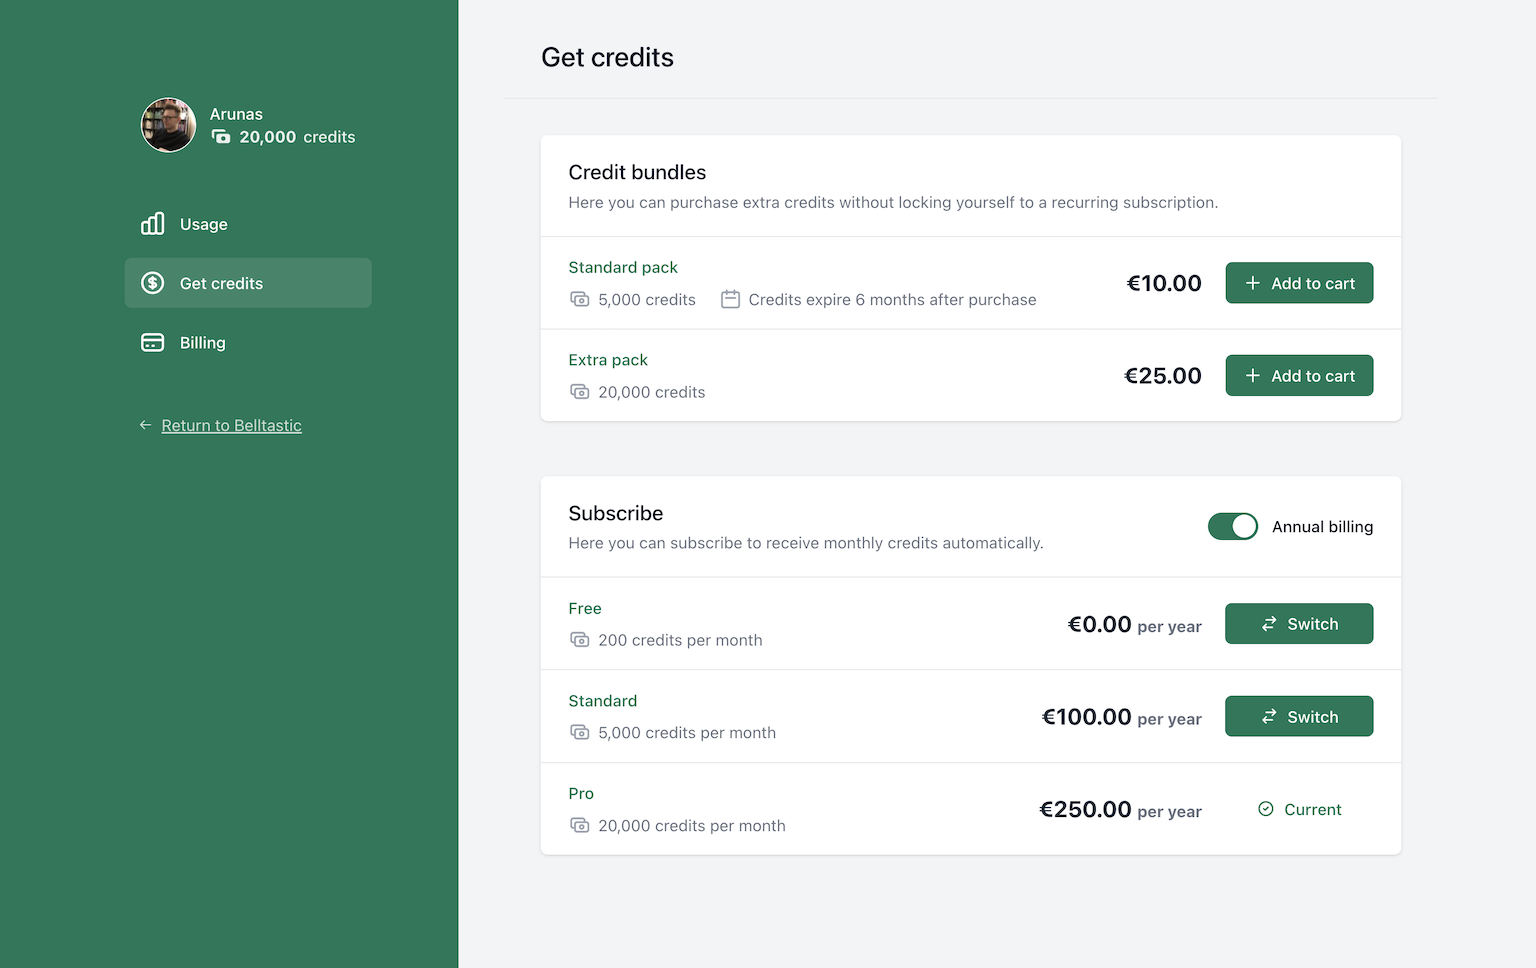
Running a successful online business involves a myriad of processes and one such critical process is handling invoices. Whether you're selling products, services, or subscriptions, timely and accurate invoicing is essential to maintain a healthy cash flow. However, manual invoicing can be tedious, time-consuming, and prone to errors.
In this blog post, we will guide you through automating the process of generating and emailing invoices with Laravel, specifically using the Laravel Cashier package. By the end of this post, you'll be able to automatically generate professional-looking invoices, customized to your needs, and have them automatically emailed to your customers.
Prerequisites
Before we dive into the main content, it's important to ensure you have the following prerequisites in place.
- Laravel Setup: You should have a Laravel application up and running. Laravel is a powerful PHP framework that simplifies the process of building complex web applications. Learn how to get started with Laravel.
- Laravel Cashier: Laravel Cashier provides an expressive, fluent interface to Stripe's subscription billing services. It handles almost all of the boilerplate subscription billing code you are dreading writing. You should have it installed and configured with your Stripe account. Learn how to set up Cashier.
- Subscriptions: You should have your subscription models set up in Laravel. If you haven't done that, you can refer to our previous guide on How to set up recurring payments in Laravel which will guide you step-by-step on setting up subscriptions using Laravel and Cashier.
- Email Providers: Lastly, you should have access to an email provider for sending emails. In this guide, we will discuss some common email providers such as Mailgun and Sendgrid, which offer free tiers for small businesses or startups.
Once you have these prerequisites in place, you are ready to automate the process of invoice generation and emailing in your Laravel application. Let's begin.
Previewing the invoice
This will only be used for us to test and to see what the final invoice looks like as a PDF. It is a great way to quickly iterate and make changes to the invoice before we start automating the process.
Create a new subscription
This article assumes you have already have a subscription for your user. If not, here's a quick reminder of how you would do that. After setting up Laravel Cashier, creating a new subscription for a user is quite straightforward. Here is an example:
$user = User::find(1);
$user->newSubscription('default', 'plan_premium')->create($creditCardToken);
In the above example, we find the user and create a new subscription for them. The 'default' in the newSubscription function is the name of the subscription, and 'plan_premium' is the specific Stripe plan's ID to which the user is subscribing. The $creditCardToken variable is obtained from your payment processor, such as Stripe, and represents the customer's payment details. Read more about setting up subscriptions for users here.
Preview the invoice
Now that we've created a subscription, we can generate an invoice for it. We'll create an HTTP route that fetches the first invoice and downloads it as a PDF.
In order to generate invoice PDFs, we first need to install a dompdf dependency:
composer require dompdf/dompdfThen, open your web.php file located at routes/web.php and add the following route:
use Illuminate\Support\Facades\Route;
use Illuminate\Support\Facades\Auth;
use Symfony\Component\HttpFoundation\Response;

Route::get('/invoice/preview', function () {
    $user = Auth::user(); // fetch the authenticated user

    $invoice = $user->invoices()->first(); // get the first invoice

    if ($invoice) {
        return $invoice->download([
            'vendor' => 'Your Company',
            'product' => 'Your Product',
            'street' => 'Main Str. 1',
            'location' => '2000 Antwerp, Belgium',
            'phone' => '+32 499 00 00 00',
            'email' => '[email protected]',
            'url' => 'https://example.com',
            'vendorVat' => 'BE123456789',
        ]);
    }

    return new Response('No invoice found', 404);
});
routes/web.php
In the above route, we're getting the authenticated user, fetching their first invoice, and using the download method to generate and download the invoice as a PDF.
You can now preview the invoice by navigating to http://localhost/invoice/preview in your browser. It will download the file to your computer.
You should now see a generated PDF of a subscription invoice. In the next section, we'll delve into how you can automate the process of emailing them to your users.
Automating emailing of invoices
Having set up and customized our invoices, the next step is to automate the process of sending these invoices via email to our users. We can tap into webhooks to automatically react to new invoices and send them to your customers via email whenever they are created.
Setting up email provider
To get started, you will need to set up your email provider. Laravel supports a range of mail drivers, including SMTP, Mailgun, Postmark, Amazon SES, and Sendgrid. These providers all offer free tiers, with Mailgun offering 5,000 free emails per month for three months, and Sendgrid offering a 30-day trial with up to 40,000 free emails.
First, sign up with your preferred email provider. They might have a "sandbox" mode as well where you can safely test sending real emails to your own address.
Once you get the email provider details, you can set up your chosen mail driver for Laravel in your .env file:
MAIL_MAILER=smtp # (or mailgun, postmark, ses, sendmail, log, array)
MAIL_HOST=smtp.mailgun.org # (or relevant host for your mail driver)
MAIL_PORT=587
[email protected]
MAIL_PASSWORD=your-email-password
MAIL_ENCRYPTION=tls
[email protected]
MAIL_FROM_NAME="${APP_NAME}"
.env
Creating the invoice mailable
Let's first create the InvoiceFinalized mailable which we could send to the user:
<?php

namespace App\Mail;

use Illuminate\Bus\Queueable;
use Illuminate\Mail\Mailable;
use Illuminate\Mail\Mailables\Attachment;
use Illuminate\Mail\Mailables\Content;
use Illuminate\Mail\Mailables\Envelope;
use Illuminate\Queue\SerializesModels;
use Laravel\Cashier\Invoice;

class InvoiceFinalized extends Mailable
{
    use Queueable, SerializesModels;

    /**
     * Create a new message instance.
     */
    public function __construct(
        public Invoice $invoice
    ) {}

    /**
     * Get the message envelope.
     */
    public function envelope(): Envelope
    {
        return new Envelope(
            subject: 'Your invoice is ready',
        );
    }

    /**
     * Get the message content definition.
     */
    public function content(): Content
    {
        return new Content(
            markdown: 'emails.invoices.finalized',
        );
    }

    /**
     * Get the attachments for the message.
     *
     * @return array<int, \Illuminate\Mail\Mailables\Attachment>
     */
    public function attachments(): array
    {
        return [
            Attachment::fromData(
                data: fn() => $this->invoice->pdf([
                    'vendor' => 'Your Company',
                    'product' => 'Your Product',
                    'street' => 'Main Str. 1',
                    'location' => '2000 Antwerp, Belgium',
                    'phone' => '+32 499 00 00 00',
                    'email' => '[email protected]',
                    'url' => 'https://example.com',
                    'vendorVat' => 'BE123456789',
                ]),
                name: 'invoice.pdf'
            )
        ];
    }
}
app/Mail/InvoiceFinalized.php
Notice this mailable takes a Laravel\Cashier\Invoice instance, which we'll get to later. The mailable sets the subject, content in Markdown (we'll describe it in the next section), and also attaches the invoice as a PDF for convenience.
Customizing the invoice email contents
For this example, we'll write the content of the email in Markdown, because of how simple it is and allows us to avoid writing a lot of the HTML boilerplate.
Let's create the file resources/views/emails/invoices/finalized.blade.php
<x-mail::message>
# Subscription invoice

A new invoice for your subscription is available.

See the attached invoice, or visit your billing portal.

<x-mail::button :url="config('app.url')">
Billing portal
</x-mail::button>

Thanks,<br>
{{ config('app.name') }}
</x-mail::message>
resources/views/emails/invoices/finalized.blade.php
If you'd like to learn more about using Markdown for your emails, or ways to customise the final generated emails, you can read more about it in the Laravel Documentation on Markdown mailables.
Reacting to the invoice webhook
When a new invoice is created in Stripe, either automatically or manually using Laravel Cashier, Stripe will send a webhook with the details of the invoice.
To automatically email customers when a new invoice has been created, you need to set up a webhook listener for the invoice.finalized Stripe event. Let's first create the StripeEventListener class:
<?php

namespace App\Listeners;

use App\Mail\InvoiceFinalized;
use Laravel\Cashier\Cashier;
use Laravel\Cashier\Events\WebhookReceived;
use Illuminate\Support\Facades\Mail;

class StripeEventListener
{
    /**
     * Handle received Stripe webhooks.
     */
    public function handle(WebhookReceived $event): void
    {
        if ($event->payload['type'] === 'invoice.finalized') {
            // Let's find the relevant user/billable
            $stripeCustomerId = $event->payload['data']['object']['customer'];
            $billable = Cashier::findBillable($stripeCustomerId);

            // Get the Laravel\Cashier\Invoice object
            $invoice = $billable->findInvoice($event->payload['data']['object']['id']);

            // Now we can send the invoice!
            Mail::to($billable)->send(new InvoiceFinalized($invoice));
        }
    }
}
app/Listeners/StripeEventListener.php
Register Stripe event listener
Let's now register the above listener to make sure handle the invoice finalized event:
<?php

namespace App\Providers;

use App\Listeners\StripeEventListener;
use Illuminate\Foundation\Support\Providers\EventServiceProvider as ServiceProvider;
use Laravel\Cashier\Events\WebhookReceived;

class EventServiceProvider extends ServiceProvider
{
    protected $listen = [
        WebhookReceived::class => [
            StripeEventListener::class,
        ],
    ];
}
app/Providers/EventServiceProvider.php
Now whenever a new invoice is created in Stripe due to a subscription renewal or other reason, your app gets notified about it and the InvoiceFinalized mail gets sent. Good job!
Test the implementation
In order to make sure we got everything right, let's test it. Listening for Stripe webhooks on your localhost is fairly easy, so let's set it up.
- Download the Stripe CLI tool
- Login to Stripe using the CLI tool -
stripe login - Listen to Stripe webhooks using the CLI tool -
stripe listen --forward-to your-app.test/stripe/webhook - You will see a "webhook signing secret", which starts with
whsec_. Copy it, and add it to your.envvariables like so -STRIPE_WEBHOOK_SECRET=whsec_.... - Trigger a new subscription or a renewal. Go to your app and subscribe a new user, which will trigger the invoice creation. If you followed previous articles, that will be your
/subscriberoute.
After subscribing, you should see a few Stripe events in your terminal which is forwarding events to your local app. One of them will be the invoice.finalized, and after it runs - you can check your logs or email to make sure the email has been sent and received.
Tip: when developing locally, set your MAIL_MAILER=log and use a tool like Log Viewer for Laravel to preview these emails without having to set up any third-party mail service. Otherwise, use a tool like Mailtrap to send fake emails - great for testing.
Conclusion and next steps
Congratulations! You have now automated invoice generation and emailing with Laravel using the Laravel Cashier package. You've learned how to create subscriptions, preview invoices, customize them to your needs, and set up automatic emailing whenever a new invoice is created.
Remember to test the entire invoicing and email process thoroughly before rolling out to your users. You can utilize Stripe's and your email provider's sandbox environments for this purpose.
Also, remember to monitor the process regularly once it's live, ensuring that all invoices are generated correctly and emails are being delivered as expected.
Finally, keep exploring what Laravel Cashier can offer. You can customize it further to suit your needs and make the payment process smoother for your customers. It has functionalities for handling coupons, swapping subscriptions, subscription quantities, and even handling failed payments.
Here's a few other interesting ways you can grow your revenue:
- Learn how to handle failed payments, so you don't miss out on potential revenue
- Consider selling API credits for upfront payments and more predictable revenue stream
Want to skip the complexity of building and maintaining your own billing infrastructure?
Spike Billing provides a complete, self-hosted billing solution that integrates seamlessly with both Stripe and Paddle. Your customers get a fully-featured portal to manage their subscriptions, one-time purchases, and billing details, while you maintain full control over the experience.
Get started in minutes with our Laravel package, or explore our extensive customization options to match your specific business needs. Visit documentation to get started, or have a look at a live demo.